Showing posts with label diy Valentine's Day. Show all posts

February 14, 2012

DIY Heart Doily Door and Table Decor Project


In honor of Valentine's Day, I thought I'd post a project to help use up all those extra holiday supplies. This simple-yet-lovely wreath is great for hanging on a door or using to decorate a table. It makes a great placemat for placing under your teapot, or under a tray of cakes and sweets at a tea party.


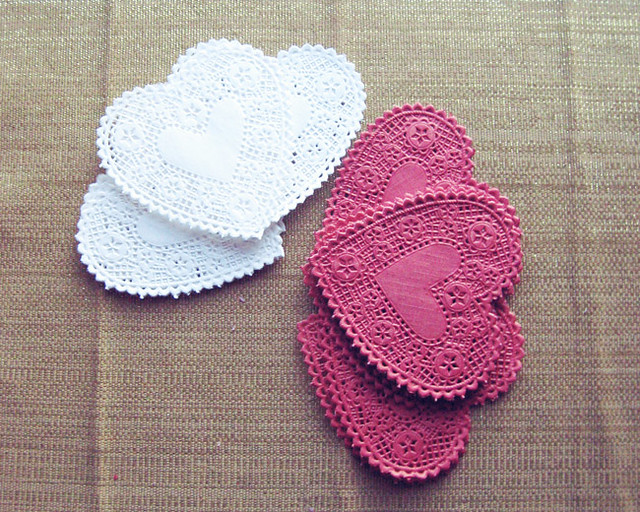
If you're anything like me, you have lots of these heart-shaped doilies sitting around after Valentine's Day. They get tucked away in a box, never to see the light of day until the next February 15th. Or you forget you have them and buy more (I have never done this...).


Using a glue stick or a bottle of glue, take two doilies and line them up. I lined up the bottom at the 5th scallop from the bottom, and the top at where the scallops just touched the outside border of the heart. Make sure the doily on the right is on top of the doily on the left.

Add another doily, placing it on top of the second doily, and lining it up in the same. If you line the doilies up at the same spots, they will naturally form a circle! Go around like this until the circle is complete.


Take a red (or other-colored) heart doily, and glue it in the center just at the points where it overlaps the circle.


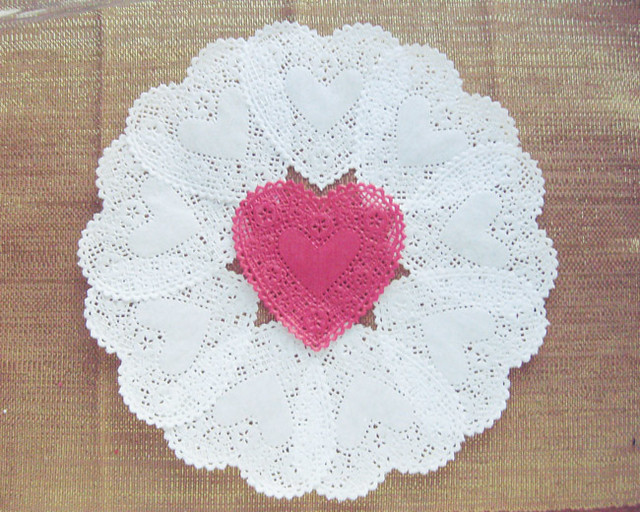
There you have it! Let the glue dry, and then hang on a door or use as a festive, love-themed placemat.

This would also be a lovely way to decorate your wedding reception space. You could make a few circles and then lay them on every table, or group them together on a wall with marriage-themed words and phrases written on the center heart.

January 20, 2012

Quick DIY Breakfast Tray Project


Thinking of making breakfast in bed for a loved one on Valentine's Day, but don't have the perfect tray? You can make your own in an afternoon, and customize it with your favorite colors and patterns.

You'll need a basic wooden tray, stain or paint, brushes, patterned paper, scissors, glue, and an old credit card or gift card.

If you don't like the finish or color of your tray, or it's scuffed up, give it a quick sanding and a wipe with a damp cloth, and then stain or paint it. I used a nice dark walnut. Let dry.

Next, find a patterned paper you like. I chose a dark purple and white passionflower - a symbol of love - pattern from a local stationery store.


To size it, I just placed it inside the tray, placing one corner of the paper in a corner of the tray, and then I used an old credit card to smooth it and crease where it met the sides. Then I removed it and cut it a few millimeters smaller than the outline. You could also trace around the bottom of the tray, and then cut it smaller (measure the thickness of the edge and subtract it).

Brush ModgePodge or another craft glue on the bottom of the tray, insert your paper carefully, and then use the credit or gift card to smooth out bubbles before the glue dries. It helps to start in the middle and push the air out to the edges.

Let the glue dry, and then apply a few coats to the top for protection. If you're planning on serving drinks, use a stronger sealant or have your local hardware store cut a piece of glass or plastic to fit.


The finished product, ready for plates of homemade French toast or pancakes, accented with a strawberry heart or two! Wash strawberries, pull the leaves off but don't cut the top, slice almost down to the top but not all the way through, and then gently push the two halves past each other so there's about 45 degrees between them to form a heart shape.

January 13, 2012

DIY Fabric Yo Yo Projects


Every year, I forget how busy the shop gets during the holiday season - and how much time I need to recuperate afterwards! The time off, however, gives me the freedom to create again purely for fun.

Lately, I've been experimenting with fabric yo yos. I first encountered yo yos while perched on my parents' bed, running my fingers over the ancient yo yo quilt that adorned it. It had been lovingly hand-sewn by my great-grandmother, an immigrant to this country who had a large family and not much money. Nothing went to waste. I'd stare at the quilt for hours on rainy afternoons, wondering where each scrap of fabric had come from and what it had been before - a shirt, curtains, a dress?

I never did find out, but I remember the vivid colors of that quilt to this day. (And one day, I vow to make my own version!)


It's very easy to make yo yos. Pick a round object to trace around - a spool of ribbon, a glass, a plate - and cut circles out of the fabric of your choice. The completed yo yo will be much smaller than the stencil you use, so don't go too small. For these small ones, I used spools of ribbons and thread.

I like to use a doubled length of thread for strength, but you can use a single one if you'd like. Thread through a needle, knot the end, and then go around the outside of your circle using a running stitch. Keep your stitches even, and fairly close to the edge (about a 1/4" from it).

When you get all the way around, pull your thread tight to gather the fabric. Stitch through the nearest folds and knot to secure. Cut your thread as close as you can to the knot, and hide any ends by tucking them into the middle.


If you use cotton, your yo yo will look like this - very flat and thin and even.


If you use silk, it won't be quite so even or round on the outer edges, but it will have more free-form charm and seem a bit more rustic.


Make yo yos of various sizes, and then stitch them together to create pendants or bracelets. You can use different colored thread - like I used red here - to add a bit of contrast, or match your thread to the predominant fabric color to hide it.

Three yo yos like this would make a great bib necklace - just attach chain or ribbon on either side so you can tie it around your neck!


Yo yos also make great snowmen adornments for decorating your home in winter.


Use three different sizes, each slightly larger than the last. Make your yo yos. Now it's time to stitch on a face and other details!


I used seed beads for the eye and mouth, embroidery thread for the carrot nose, and festive red pearls for the buttons.

For hanging, attach a loop of ribbon or thread to the top of the back of his head.


Yo yos also make lovely flower rings. I used silk for these, in yellow and scarlet.


I made a leaf out of a triangle of velvet - use a running stitch across the longest side, and pull tight to gather. Knot, and trim the ends.


Attach the leaf using fabric glue, and then use jeweler's epoxy or another strong glue to attach the flower to the ring base.

These would make great gifts for your friends for Valentine's Day, or for bridesmaids!

You Might Also Like:

Related Posts Plugin for WordPress, Blogger...