Showing posts with label DIY decor. Show all posts

January 26, 2015

DIY Knitted Winter Wreath


I know wreaths are usually associated with Christmas, but I created this knitted winter wreath with an eye towards having one I could display all winter long. It's Christmas-appropriate but also perfect for displaying during the frosty, freezing winter doldrums when all you want to do is huddle under a million blankets and drink your weight in hot chocolate. (New England, I have such a love/hate affair with you!)


I'm going to give you a general outline, so that you can customize this to your taste. I'd advise using what you already have. It's a great scrap yarn project!

I had a thick (either Aran or Bulky weight, I believe) almost curly off-white yarn sitting around. I cast on varying amounts of stitches (I want to say 7 for the smaller one - aka the inner one shown above - and 10 for the larger one) on size 13 needles. Then I knit in i-cord until it was a length I was pleased with.

Now, since I used large needles, my i-cord is a bit hole-y/lace-y. I knew my stuffing would match the yarn pretty closely and only be noticeable close up, so this was intentional. Why cast on more stitches and make a tighter tube if it won't show? (Also known as, I was being lazy. I'm okay with that.)


Here's a close-up of my two i-cord tubes. For the rest of this tutorial, I'll be using the larger one. I decided I liked it better.


I had some polyfill laying around, so I used a long, straight knitting needle to pack it in. I wanted this to not sag when hung up, so I stuffed it pretty tightly. If you don't mind a little drooping, stuff it less. There's no right or wrong way! Then stitch the ends of your tube together. I chose to sort of graft them into one continuous tube, rather than closing both ends and then connecting them. You could do it either way, this one is just a bit faster.


Choose a ribbon, and either use a large needle (like a tapestry one) to pull it under a loop so it's secure when you tie a bow or make a bow and then hot glue it on.


Trim the ends to whatever length you like, and voila! I thought gold and white would be nice winter colors, but use what you have. You could do light blue and white, red and white, gray and white, ice blue and light gray, etc.


Here's my finished wreath! The whole thing took me less than two hours so you could whip one up in a day as well.

August 9, 2012

DIY Upcycled Polaroid 600 Film Pack Frame


Polaroids have an instantly recognizable shape - not quite square, but much shorter and wider than a 4 x 6. So how exactly do you frame such an out-of-the-ordinary size? You use the leftover 600 film pack to create the perfect frame! This project is quick (it takes all of five minutes) and eco-friendly.

The film pack shown here was purchased from The Impossible Project - they took over production once Polaroid went out of business.


First, once you've used up all the film of course, remove the pack from your camera. It will look like this.


I've used red to mark where to cut the metal. I used sharp kitchen shears, but any pair of sharp scissors will do! Wear gloves and protective glasses, if you have them. You can file down the edges after as well if they are very sharp.


Here's what it looks like once you cut it and remove the metal piece from the middle.


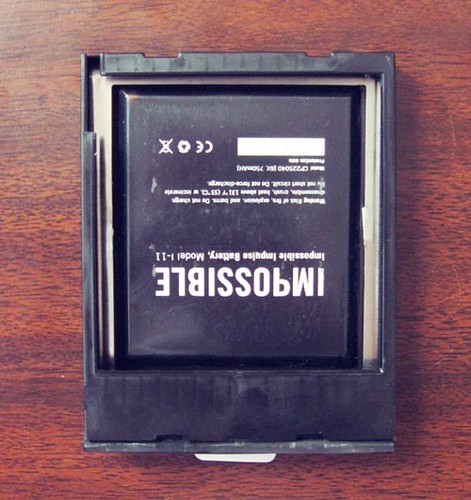
Open the flap at the bottom, and remove the remaining metal and battery pack.


Here's what the innards look like. We're going to be bending the remaining metal next.


The metal should bend pretty easily. I took one short end in my left hand and the other in my right and gave it a gentle bend towards my face. Check it against the film pack - you want the highest part of the arch to be slightly higher than the height of the pack.


Safely discard the battery pack. Push the metal arch into the box to check the height and then turn the box vertically to check the tension. If you made the arch high enough, it will have enough tension to hold itself in place inside! If it's not right, just remove it and adjust as necessary.

This photo is actually upside down - I did it like this so you can see the arch better. (You can tell it's upside down by the flap at the bottom). I decided that I wanted the arch to touch the bottom of the box, so that the flat short ends of the metal piece would hold the photo flat against the front of the frame. If you do it the other way, then only the arches touch the photo and it may curl away from the frame's face.


Here it is right-side-up again, with a photo in place. At first, I wasn't sure what to do with the bottom flap. If I taped it shut, the tape would show. If I glued it, I wouldn't be able to change the photo. So I just removed it.


Here's what it looked like after. Much better. If you're worried about the picture falling out, you could apply some tape just inside the bottom so that it won't show to hold it in place. I left it as is and haven't had any issues so far!


The finished product! I was initially going to hang it on the wall, but I've actually become fond of just standing it upright on my desk. I think I'm going to create a row of my favorite colorful Polaroid photos next to add color and personality to my studio.

If you wanted to take this a step further, you could paint the frame to match your decor (or white, to look like an unframed Polaroid). You could also create a Polaroid transfer on really thin, translucent paper (maybe rice?) and find a way to add an LED light behind it to create a photo box effect.

I think I just found my next project!...


You Might Also Like:

Related Posts Plugin for WordPress, Blogger...