Showing posts with label upcycling. Show all posts

August 9, 2012

DIY Upcycled Polaroid 600 Film Pack Frame


Polaroids have an instantly recognizable shape - not quite square, but much shorter and wider than a 4 x 6. So how exactly do you frame such an out-of-the-ordinary size? You use the leftover 600 film pack to create the perfect frame! This project is quick (it takes all of five minutes) and eco-friendly.

The film pack shown here was purchased from The Impossible Project - they took over production once Polaroid went out of business.


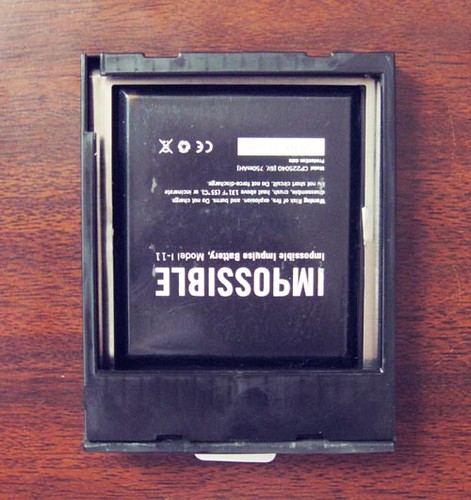
First, once you've used up all the film of course, remove the pack from your camera. It will look like this.


I've used red to mark where to cut the metal. I used sharp kitchen shears, but any pair of sharp scissors will do! Wear gloves and protective glasses, if you have them. You can file down the edges after as well if they are very sharp.


Here's what it looks like once you cut it and remove the metal piece from the middle.


Open the flap at the bottom, and remove the remaining metal and battery pack.


Here's what the innards look like. We're going to be bending the remaining metal next.


The metal should bend pretty easily. I took one short end in my left hand and the other in my right and gave it a gentle bend towards my face. Check it against the film pack - you want the highest part of the arch to be slightly higher than the height of the pack.


Safely discard the battery pack. Push the metal arch into the box to check the height and then turn the box vertically to check the tension. If you made the arch high enough, it will have enough tension to hold itself in place inside! If it's not right, just remove it and adjust as necessary.

This photo is actually upside down - I did it like this so you can see the arch better. (You can tell it's upside down by the flap at the bottom). I decided that I wanted the arch to touch the bottom of the box, so that the flat short ends of the metal piece would hold the photo flat against the front of the frame. If you do it the other way, then only the arches touch the photo and it may curl away from the frame's face.


Here it is right-side-up again, with a photo in place. At first, I wasn't sure what to do with the bottom flap. If I taped it shut, the tape would show. If I glued it, I wouldn't be able to change the photo. So I just removed it.


Here's what it looked like after. Much better. If you're worried about the picture falling out, you could apply some tape just inside the bottom so that it won't show to hold it in place. I left it as is and haven't had any issues so far!


The finished product! I was initially going to hang it on the wall, but I've actually become fond of just standing it upright on my desk. I think I'm going to create a row of my favorite colorful Polaroid photos next to add color and personality to my studio.

If you wanted to take this a step further, you could paint the frame to match your decor (or white, to look like an unframed Polaroid). You could also create a Polaroid transfer on really thin, translucent paper (maybe rice?) and find a way to add an LED light behind it to create a photo box effect.

I think I just found my next project!...


March 10, 2011

Subway Cars...Underwater


First thought upon seeing this: "Oh no, the dolphins!" (Okay, maybe that's slightly exaggerated...I was mostly perplexed as to how this is legal.)

Then I read the accompanying article, and all was made clear: these subway cars are getting second lives as artificial reefs along the Atlantic shore.

Unlike us humans, the fish/corals/assorted sea creatures will never have to experience late or disabled trains, smelly passengers, and sticky seats. Lucky them!

July 1, 2010

DIY Vintage Dress Clip Necklace Tutorial


You can find charming vintage dress clips at almost any flea market or vintage store. They were popular in the 1950's and 60's, when they embellished clothes and shoes. But how do you wear them in more modern, much less dressy times? I recommend upcycling these inexpensive, rhinestone-covered beauties into a lovely necklace in just a few simple steps!


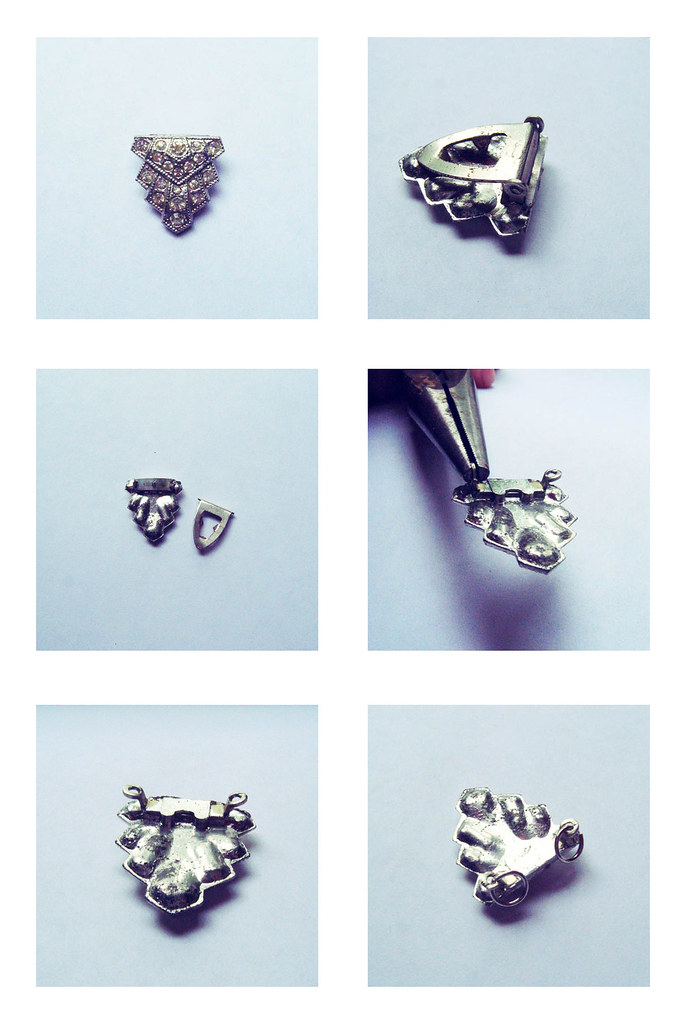
First, find a dress clip you like (top left). Turn it over, and take a look at where the clip part connects to the front (top right). Using needlenose pliers, gently bend the round connector out to the side, and then remove the clip (middle left). Bend the connector out on the other side as well (middle right). I chose to bend mine at a 90 degree angle so that they will not poke into me when I wear the necklace (bottom left). Attach jump rings to each connector (bottom right). I used the size pictured because it was what I had, but you could use smaller ones as well. Just make sure they're large enough for both the connector and a chain.


Choose a chain in a style and length you like, and thread it through both rings. Then put on your new necklace, and enjoy!

September 3, 2009

Clever Housewares


Clever and functional housewares: a "Wine Bottle Chandelier" from Pottery Barn, and "Chat Plates" from MoMa.

Besides decorating a home, these products could be used for creative projects as well!

I think the plates would be great for staging a photoshoot, featuring "looking down from above"-type shots. Everyone at the table could have one of these plates, with either words or different types of food on them. The plates could be photographed individually as well. Placing one on a white background would emphasize the contents, while using a more colorful backgrounds would really make the white plate pop.

You could also modify the chandelier shown here. Instead of the bulbs being in the middle, you could cut the bottoms off the bottles and string lights inside them. You could do this with a single bottle as well. A line of lights like this hanging over a kitchen island, table, or desk would lend a rustic-yet-elegant touch. The bottles could be all the same color, or different colors for more variation. Kits for making your own lamps can easily be found at hardware and home decor stores!

To learn how to cut glass bottles yourself, check out this tutorial.

You Might Also Like:

Related Posts Plugin for WordPress, Blogger...