Showing posts with label projects. Show all posts

July 21, 2011

Quick Summer Seashell Ring Tutorial


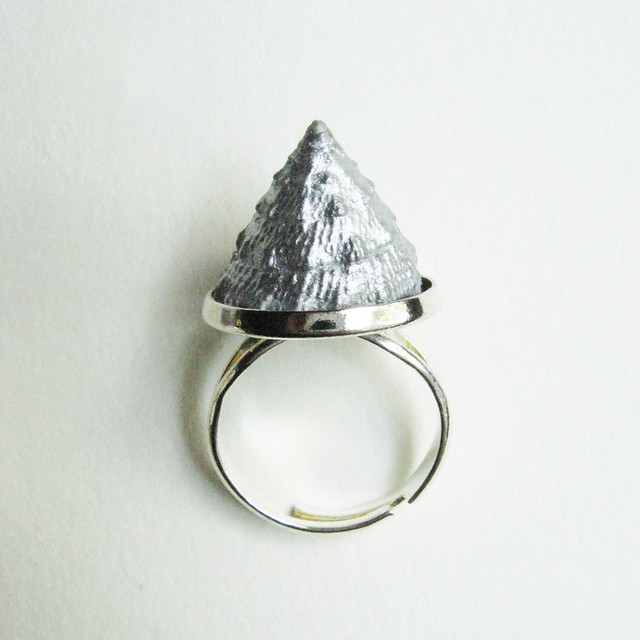
This silvered shell ring is so easy to diy, you'll be able to whip one up in time for a sunny daytrip or night out whenever you need something new to wear!

You'll need the following (see below for pictures): a ring blank, a seashell of your choice - make sure it's a few millimeters smaller in diameter than your blank, jeweler's glue or epoxy - I use E6000, and Rub 'N Buff in Silver Leaf.


Take your shell, and apply a good amount of glue/epoxy to the bottom. Place it firmly inside your ring blank, and allow it to dry thoroughly (see directions on the tube for approximate times).

Once it's dry, take your Rub 'N Buff and apply liberally using a brush (or your fingers... I tend to use the latter to ensure I get it into every crevice). The Rub 'N Buff shade shown here is liquid silver leaf - so much easier to apply than the extremely fragile leaf sheets! Plus, you don't need a special glue. It will stick to your seashell all on its own. It also comes in a crazy amount of colors - gold leaf in various shades, silvers, pearlescent colors, a vibrant red, and many more.

Allow to dry, then buff off with a rag or paper towel until no more extra silver comes off. That's it! You can wear and enjoy your ring as soon as the silver is dry.

Experiment with different size blanks and shells, or different colors (gold leaf on faux gold, rose gold on silver, pearlescent blue on silver). There are so many different combinations you can play around with to make a ring that's uniquely you.

July 15, 2011

DIY Lichen Pendant Necklace


In this quick & easy tutorial, I'll show you how to create a woodsy, nature-y pendant that's a perfect statement necklace piece for the summer!


First, take a walk around your neighborhood or woods to find a lichen that you like (no pun intended). You want a piece still attached to bark or some other sturdy material, as the lichen would be too flimsy and fragile on its own.


I found this piece on our sidewalk after a particularly blustery storm. I think it got knocked off our pine tree by the wind (or by a squirrel skittering up and down the trunk).

Make sure that the lichen you pick has fallen off naturally, either from the wind or from its tree being felled.

Please do not pry off a lichen from a living tree! Lichens take years to grow into the size shown, and do not grow back quickly or easily.


Coat your lichen with a layer of craft glue so that it's less likely to break when it hits something. I used Modge Podge but you could also use Tacky Glue or some type of jeweler's medium. You could even use resin, if you have experience working with it.

Use a brush to get into all the cracks and crevices. Let one side completely dry before you flip it over and do the other side. Working on a piece of waxed paper helps prevent the lichen from sticking as you coat it and as it dries.


I removed a piece of the plain bark, so that my pendant would be a more pleasing shape (and mostly lichen). Then I pierced a hole using a large needle, and used needle-nose pliers to make a bail out of wire.

If you have large jump rings, you could use pliers to attach one instead of using wire. Whatever you use, don't make your hole too close to the edge! Otherwise, the hole will eventually tear from use and the pendant will fall off.

String with a chain of your choosing, and wear your new creation! I used bright gold chain to play off the blue and green hues in the lichen, but an antique bronze or gold shade would work nicely as well.

February 24, 2011

DIY Birch Bark Necklaces


If you've ever taken a walk through the woods, you've probably seen stands of white birches with their distinctive, papery bark. The material is great for lightweight, unique pendants that you can easily make yourself.

Please don't strip a live tree, however! Look for branches that have fallen (or been pruned) off instead. If they've been exposed to the elements for a few months, the wood inside will have started to rot and it'll be very easy to slide the bark off in one piece.


Try to find a piece that has lots of interesting details - curved knots, dark and rough patches, neat striations and lines. These imperfections are perfect for creating one-of-a-kind pendants!


Here are some of the different shapes you can cut out. Geometric shapes like triangles and half-circles work well, but asymmetrical ones look great too. You can see that I cut some fringe into the piece on the bottom left to add even more detail. Do whatever you like!


Use an awl or thick sewing needle to pierce holes near the top on either side. Don't force it through too quickly, or you might rip through the bark. Twisting the needle or moving it back it forth as you push it through works best. Attach jump rings using needle-nose pliers, and attach whatever type of chain you like (not shown).


The finished product! You could also use two pieces, keeping one as the bottom pendant and attaching a smaller one further up on the left or right side as an accent piece.

Try not to get your necklace wet, or the bark may brown from the tannins in the bottom layers. For this reason, I wouldn't recommend glazing it with ModPodge or something similar either. It should be pretty strong and sturdy as is, as long as you're not too rough with it!

December 16, 2010

Happy Holidays


Just a quick note that my shop is now closed for the holidays. A big thank you to everyone who visited and purchased from my shop, and to all of you for reading my humble blog! I really do appreciate everyone who takes the time to support handmade art and small businesses. I hope you all have a wonderful holiday season, filled with everything you love and everyone you hold dear! (And lots of snow - if you don't hate shoveling, that is!)

I'll still be blogging here during the next few weeks, but I'm also planning on taking a spin around the Frog Pond, making gifts and cookies, and drinking my body weight in hot cocoa!

I'll have some handmade projects up soon, just in time for Christmas. I promise they'll be lovely but easy. No impossibly-perfect, time-consuming Martha crafts here!

(Although I do adore her website...and magazine...and books. Okay, I'll admit it, I secretly love her too.)

In the meantime, enjoy this brightly-colored "Winterberry" painting from Still Life Quick Heart!

September 24, 2010

DIY Bird Bookmark


Following the bird theme going on this week, I thought I'd share a quick and easy diy bird bookmark project!


Inspired by this metal bird bookmark from Our Shop in the UK, I decided to make a similar paper version based on my own favorite species of birds.


A titmouse like the one above loves to sit in the nearby cherry tree and sing. (I forget where I found this photo - please let me know so I can link it if you recognize this!). I love the gray color of its feathers, and its little head crest!


I also used a picture of a European robin (again, let me know if you recognize this!). I love how tiny they are, and the contrast of their bright red and white chests. They remind me of vacationing in Ireland!

Once you've picked a photo of your favorite bird, print it out and grab a pencil. To transfer the image, first take a pencil and rub it across the back of your picture. Make sure you press down pretty hard so that you get a good dark layer of graphite on it! Turn your paper back over, and use the pencil to trace the image onto card stock or other thick paper. Make sure you trace the outlines of the wings and eye, and include a few details like feathers here and there on the body.

In the photo above, you can see where I traced over with a pencil.


Lift the paper up, and go over the lines on the card stock with a pencil to darken them and make them clearer.

Get an exacto knife or similar blade, and put a piece of thin cardboard under your cardstock (make sure it's not too thick, or your knife will get stuck!). Cut around the body of your bird first, being very careful around the legs and tail. Then cut out the eye. Make sure you're cautious while cutting - you don't want to injure yourself!

The next important part is getting the wing. This will become the flap that will hold your bookmark over the page. Cut around the wing, then cut a parallel line a few millimeters away, and connect the two lines at the ends with circles. This will make a notch to hold it in place.

For the robin, I only needed one side of the wing because the top of it was the outline of the bird. For the titmouse, the top of the wing was lower on the body so I cut all the way around it.

Use the two-line technique (without circles at the end) to cut out the remaining details. I used a sort of football shape for the small lines. You don't have to cut out every line - just pick and choose as you go along, and stop when you think it looks good!

Erase any remaining pencil lines, make a nice hot cup of tea, and reach for a favorite book!


July 1, 2010

DIY Vintage Dress Clip Necklace Tutorial


You can find charming vintage dress clips at almost any flea market or vintage store. They were popular in the 1950's and 60's, when they embellished clothes and shoes. But how do you wear them in more modern, much less dressy times? I recommend upcycling these inexpensive, rhinestone-covered beauties into a lovely necklace in just a few simple steps!


First, find a dress clip you like (top left). Turn it over, and take a look at where the clip part connects to the front (top right). Using needlenose pliers, gently bend the round connector out to the side, and then remove the clip (middle left). Bend the connector out on the other side as well (middle right). I chose to bend mine at a 90 degree angle so that they will not poke into me when I wear the necklace (bottom left). Attach jump rings to each connector (bottom right). I used the size pictured because it was what I had, but you could use smaller ones as well. Just make sure they're large enough for both the connector and a chain.


Choose a chain in a style and length you like, and thread it through both rings. Then put on your new necklace, and enjoy!

May 24, 2010

Pretty Paper Flowers

This elegant diy paper flower bouquet is featured on Project Wedding.

Though it's originally meant for a bride, I think it would also make a lovely, long-lasting arrangement for a foyer or dining room table. You could also use the flowers to make a garland, and string it across a room or tree as a reusable party decoration!

February 14, 2010

Victorian Puzzle Purse Valentine

I've always been fascinated by antique or vintage valentines, hand-drawn and created with so much love. So this year, inspired by this tutorial, I decided to make my own Victorian Puzzle Purse!

For the calligraphy, I used a hawk tip (left) for the words and a globe tip (right) for the drawings. I think the globe is easier to control for fine lines, while the hawk tip makes handwriting look charmingly imperfect and vintage. For paper, I used plain parchment. For a more antique feel, you could soak the paper in tea til it reaches the desired hue. This can make the paper more delicate, however, and cause tears. Handle gently!

Here's the front of the valentine. I made a scalloped-edged blob with red watercolor paint, and let it dry. Then I added petals using the globe tip, and added leaves. Then I finished with the first line from the Robert Burns poem "A Red, Red Rose".

Make sure you let the ink dry thoroughly before moving on to the next layer!

Close-up detail of the rose. You'll notice my lines aren't perfect (especially when it comes to the lettering). Don't think yours has to be flawless! The imperfections add charm and reinforce the handmade look.

The second layer, decorated with a center heart and the second line from the poem.

The inside! Add whatever sentiments you like. You could also add another stanza from the poem. I chose to go with a simple yet heartfelt "I love you" and another rose.

Hope you all have a wonderful Valentine's Day!

December 29, 2009

Festive Banner


I made this festive red foil banner to hang over a doorway. It's easy to make, and can be customized to fit any space!


I had leftover cupcake liners from holiday baking, and decided to put them to good use.


Cut about a half-inch wide strip all the way around from the top of the liner. Save the bottom for another use. (You can cut out the bottom circle and use it as a gift tag!)

Grab the two ends of the strip. Twist in opposite directions, until you like the way it looks and the twist holds itself in place.


Thread a needle with whatever color you wish. (I used an offwhite, strong upholstery thread.) If you want the twists to appear to be floating, use monofilament.


I folded down the top of the twist before piercing it, so the knot wouldn't rip through the foil. I used a single knot, but you can double-knot it if you would like.


Space the twists however you like - I did every 6 inches. Though red and white are great colors for Christmas, they also work for Valentine's Day! (I think I'll keep mine up until then!)

You can substitute silver liners for a winter/New Year's Eve version, or make this in the springtime using pale pastel yellow, green, pink, and/or blue ones.

September 3, 2009

Clever Housewares


Clever and functional housewares: a "Wine Bottle Chandelier" from Pottery Barn, and "Chat Plates" from MoMa.

Besides decorating a home, these products could be used for creative projects as well!

I think the plates would be great for staging a photoshoot, featuring "looking down from above"-type shots. Everyone at the table could have one of these plates, with either words or different types of food on them. The plates could be photographed individually as well. Placing one on a white background would emphasize the contents, while using a more colorful backgrounds would really make the white plate pop.

You could also modify the chandelier shown here. Instead of the bulbs being in the middle, you could cut the bottoms off the bottles and string lights inside them. You could do this with a single bottle as well. A line of lights like this hanging over a kitchen island, table, or desk would lend a rustic-yet-elegant touch. The bottles could be all the same color, or different colors for more variation. Kits for making your own lamps can easily be found at hardware and home decor stores!

To learn how to cut glass bottles yourself, check out this tutorial.

March 14, 2009

Design Ideas

I saw this on Flickr today, and immediately had to post about it! It's a series of framed photos, forming a large clock on the wall. The hands are attached to a box containing the mechanisms and a battery, mounted in the middle.

This would be a great way to display family photos, artwork from family members, small prints from fine artists, maps, or just favorite pictures cut from magazines and newspapers. You could even use shadowboxes instead of frames, and fill them with mementos or sentimental objects.

For more photos from Decor8, click here!

You Might Also Like:

Related Posts Plugin for WordPress, Blogger...