Showing posts with label summer jewelry. Show all posts

August 5, 2013

More Nautical Knot DIY Projects

It may be August already, but there's plenty of summer left before autumn arrives! I've been seeing really creative nautical knot-themed jewelry and accessories everywhere, and you still have lots of time to make and wear them to a beach, cabin, or lake house before it's time to pull out long-sleeved shirts and sweaters. To go along with my DIY Monkey's Fist Knot Nautical Necklace post from a few weeks ago, here are two more nautical knot-themed DIYs from my Pinterest page for you.


This first one shows a really easy nautical knot bracelet. You can make it monochrome, or use two colors for contrast and interest.


This last one is for a simple but lovely nautical knot headband. I really like the adjustable system they use - it's clever and easy!

See more of my DIY accessory pins at this link, and follow me on Pinterest if you would like!


July 21, 2011

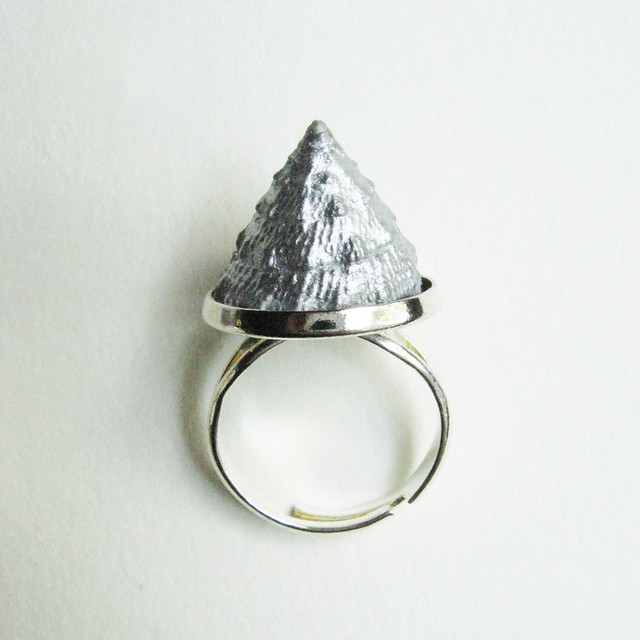
Quick Summer Seashell Ring Tutorial


This silvered shell ring is so easy to diy, you'll be able to whip one up in time for a sunny daytrip or night out whenever you need something new to wear!

You'll need the following (see below for pictures): a ring blank, a seashell of your choice - make sure it's a few millimeters smaller in diameter than your blank, jeweler's glue or epoxy - I use E6000, and Rub 'N Buff in Silver Leaf.


Take your shell, and apply a good amount of glue/epoxy to the bottom. Place it firmly inside your ring blank, and allow it to dry thoroughly (see directions on the tube for approximate times).

Once it's dry, take your Rub 'N Buff and apply liberally using a brush (or your fingers... I tend to use the latter to ensure I get it into every crevice). The Rub 'N Buff shade shown here is liquid silver leaf - so much easier to apply than the extremely fragile leaf sheets! Plus, you don't need a special glue. It will stick to your seashell all on its own. It also comes in a crazy amount of colors - gold leaf in various shades, silvers, pearlescent colors, a vibrant red, and many more.

Allow to dry, then buff off with a rag or paper towel until no more extra silver comes off. That's it! You can wear and enjoy your ring as soon as the silver is dry.

Experiment with different size blanks and shells, or different colors (gold leaf on faux gold, rose gold on silver, pearlescent blue on silver). There are so many different combinations you can play around with to make a ring that's uniquely you.

July 15, 2011

DIY Lichen Pendant Necklace


In this quick & easy tutorial, I'll show you how to create a woodsy, nature-y pendant that's a perfect statement necklace piece for the summer!


First, take a walk around your neighborhood or woods to find a lichen that you like (no pun intended). You want a piece still attached to bark or some other sturdy material, as the lichen would be too flimsy and fragile on its own.


I found this piece on our sidewalk after a particularly blustery storm. I think it got knocked off our pine tree by the wind (or by a squirrel skittering up and down the trunk).

Make sure that the lichen you pick has fallen off naturally, either from the wind or from its tree being felled.

Please do not pry off a lichen from a living tree! Lichens take years to grow into the size shown, and do not grow back quickly or easily.


Coat your lichen with a layer of craft glue so that it's less likely to break when it hits something. I used Modge Podge but you could also use Tacky Glue or some type of jeweler's medium. You could even use resin, if you have experience working with it.

Use a brush to get into all the cracks and crevices. Let one side completely dry before you flip it over and do the other side. Working on a piece of waxed paper helps prevent the lichen from sticking as you coat it and as it dries.


I removed a piece of the plain bark, so that my pendant would be a more pleasing shape (and mostly lichen). Then I pierced a hole using a large needle, and used needle-nose pliers to make a bail out of wire.

If you have large jump rings, you could use pliers to attach one instead of using wire. Whatever you use, don't make your hole too close to the edge! Otherwise, the hole will eventually tear from use and the pendant will fall off.

String with a chain of your choosing, and wear your new creation! I used bright gold chain to play off the blue and green hues in the lichen, but an antique bronze or gold shade would work nicely as well.

You Might Also Like:

Related Posts Plugin for WordPress, Blogger...