Showing posts with label silver. Show all posts

August 28, 2014

DIY Nautical Anchor Necklace and Earring Set Tutorial


Just in time for summer's end (sorry guys, but these would make great Christmas presents!), I have a DIY Nautical Anchor Necklace and Earring Set tutorial. It's really easy, and can be customized to whatever length and spacing you like.

I purchased silver anchor charms on Etsy that were a good size (about an inch or less), and I made sure they had a hole at the top for a jump ring and another hole somewhere on the bottom for another jump ring. You could definitely purchase ones with only a top hole, however, and just have them dangle off instead of being connected on both sides with chain. As you'll see close-up later, I did this with the bottom-most anchors of each chain, to make them pendants.

I had silver chain from another project sitting around, so I used it for these pieces as well. The chain I used has small links and is pretty delicate, but if you want something bolder, go for it!


I like long necklaces, so I made my outermost one about 33 inches, and the inner necklace about 27.5 inches.

I used pieces of twine to choose the lengths, then laid out each piece of twine in a straight line on a flat surface to plan my necklace. I found the center point of each and marked it for the hanging anchors, and then measured 5 inch lengths on either side and marked those. I laid out my anchors and jump rings next to these markings, so that the bottom jump ring would fall at the 5" mark. This would leave 5" of chain from the bottom of the anchor to the pendant. I found this method - using rounded lengths of chain - to be easier when it came time to measure and cut the chain. Then I wouldn't have to subtract half of the anchor and jump ring length, or measure strange lengths.

Based on laying out my anchors and jump rings, I then measured 5" lengths from the top jump rings to figure out where the next anchor would go. For the outer necklace, I ended up with two anchors (4 total) on either side of the pendant, and one anchor (2 total) for the inner necklace.

I used fewer on the inner, even though I ended up having about 7.5 inches of chain on each side going up to the clasp (instead of 5") because I didn't want anchors rubbing against my collarbone area. However, you could make the inner necklace have two anchors on either side if you wanted. Use whatever spacing you like as well!

I then cut my lengths of chain, and attached them between the anchors using pliers and the jump rings.


Here's a close-up of one of the hanging anchor pendants.


Here's what the bottom parts of each chain look like. At the top part of necklace, for the clasp, I attached both the inner and outer necklace chains to one jump ring on each side and then attached these rings to the clasp. Make sure your chains don't get twisted as you do this!


Since I had leftover charms and still more chain, I made matching earrings. The longer chain length is about 1.75", and the shorter piece is about 1". Again, you can customize this part depending on your personal taste and style!

Even though I used anchors here, you could use a variety of charms (or even mix and match). Crosses, ship's captain's wheels, little bows, Celtic knots. You could change the metal color as well, especially to rose gold or a nice warm bronze for fall.

How would you customize this?

April 3, 2013

Spring Etsy Finds


I just thought I'd share some of the spring Etsy finds I've been loving lately! 

I've become a little obsessed with Marimo moss. The balls are bright green and velvety! The moss is actually an algae that likes to live in water and is easy to grow. You can buy this premade Japanese Marimo moss ball terrarium by Pink Serissa for instant greenery and detail in your home, or you could purchase a moss ball and some pebbles and make your own.


Spring seems to call for simple jewelry to match with flowing, colorful dresses, and these sterling silver teardrop dangle earrings by Popsicle Drum are the perfect accent. The hammered surface adds subtle detail, and the size is just right. I also like that they're dangly, so they'll move with you or in the breeze like a tiny windchime.


This beach limpet shell pendant necklace by Rock Rose Jewellery is another great simple piece. Limpets are one of my favorite shells to collect, so this lovely silver pendant also reminds me of happy childhood summer days at the beach!


To go along with the simple jewelry theme, here's a delicate gold bar nameplate necklace by Momentus NY. I like the classic look - it's not something that will go out of style. The nameplate bar is also different than the usual round or oval name pendants that you see.


I've always been fascinated by cuckoo clocks, but I've never seen them given a modern twist before! These neon pink and gold cuckoo clocks by Gallivanting Girls are classic cuckoo clocks from Germany that have been painted in hot pink, gold, and white. I think they'd be perfect in a modern white living room or hallway. I wonder if the bird inside has been painted, too!

What Etsy finds are you loving so far this spring?

December 19, 2012

DIY Glittered Birds from the Dollar Store


Here's another quick and easy DIY project for the holidays: festive birds using inexpensive birds from the dollar store and colored glitter!


I bought a couple doves and cardinals from the local dollar store. They looked okay, but the feathers were a bit thin in places and they looked, well, cheap up-close. So I decided to fancy them up!

I brushed on Mod Podge with a small brush, doing small areas at a time. I put a piece of paper underneath the birds to catch glue drips and spills, and then carefully shook glitter over the glue-painted parts.

For the dove, I decided to do the wings first. Then I did the tail. Finally, I did the beak and feet. I used silver glitter (also from the dollar store, although more expensive German glass glitter would look even better!). I liked the way it contrasted with the white - it seems very Winter Wonderland-y to me!

I used red for the cardinal and covered everything except the black face mask and eyes. However, I only painted one area at a time so that the glue would not dry in places before I'd applied the glitter.


Voila! Here's what they look like from above. Try not to touch them too much after you sprinkle on the glitter. Give them an initial tap or two to get off the excess (and pour it back into the container so as not to waste it), but then let them dry thoroughly. After they've dried, if some areas need more glitter, carefully dab on more glue and shake on glitter again. Repeat until you get the desired effect.

At this point, you have two options. You can leave them as is and when you go to use them, you might get glitter on nearby surroundings as tiny pieces come loose. Or, you can seal the glitter. I recommend the latter! (Side note: also great for DIY glittered heels, gift tags, ribbons, fascinators, etc.)

You have quite a few choices: pastel or charcoal fixatives, acrylic spray sealants, Mod Podge (might take off glitter when you brush it on, though), or other glue-type sprays. I'm going to try an Elmer's version. I'll report back and let you know how it works once I've applied it. Whatever you use, make sure you follow the directions on the can/container!

These have wired feet, so you can turn them into ornaments for the tree after they've dried. They'd also look great tucked into Advent wreaths, Christmas wreaths, garlands, or on top of presents (for very lucky recipients!).

I still have a few of these birds leftover. I might make the dove light pink or yellow for Easter, and do the cardinal in blue (so it looks like a Blue Jay) or another bright color for the summer. Just change your glitter color to match the season!

What would you use these for? Any other ideas?


November 23, 2011

DIY Silver Spool Knit Necklace


I discovered spool knitting last year, and I've become addicted to it! It may look complicated initially, but it's actually really simple to create the knitted hollow tube once you get the hang of it and the end results look elegant and modern.

I made the flapper necklace shown above by spool knitting, and I'll show you how to make your own necklace below!


For tools, you'll need an old wooden spool, a crochet hook, 5 tacks or nails, and string. I used thick vintage silver metallic thread. If you can't find an old wooden spool, they do sell newer plastic contraptions that you can spool knit on.


Try to evenly space the tacks around the hole in the middle, and hammer them down about 1/3 to 1/2 of their length. Don't worry about it being perfect - you can see my spacing is just a little bit off, but the necklace still turned out well!


Take the end of your thread, and feed it down the hole from top to bottom.

Working counterclockwise around the hole, loop the string at the top of the hole clockwise around each tack/nail. Your string's tail should still be sticking out of the bottom of your spool.

Go around one more time, counterclockwise around the hole but clockwise around the pegs.


Now take the end of your string that's hanging out of the bottom of your spool, and hook it around your pinky. Then feed it back up the hole from bottom to top.


Hook the tail under the two rounds and then over them. Feed the tail back down the hole again from top to bottom. Remove your pinky when the tube is longer (hanging out the bottom) and pull the end so that the loop over the rounds is tight. This locks the thread around the bottom of the knitted tube so that pulling the tube down as you go along to make room for new rounds is easier.


To knit, use the crochet hook to pull the bottom loop on each peg over the top loop and off the nail. Go around each peg (5 total). Then loop your string around again, counterclockwise around the hole and clockwise around each peg.

Repeat until your tube is the length you would like! It really is that easy.


Here's what the tube looks like when it comes out the bottom of the spool. When your tube is the desired length, cut the silver thread you've been looping around, leaving a generous tail (6"). Leave only one round of loops on the nail. Thread the tail through one loop, and then pull the loop off the nail. Do this with all remaining 4 loops, and then pull the tail tight to finish! You may pull it through the last loop again and knot it at this point, just to be extra-secure.


I decided to make my knitted tube about 75 inches long, so I could comfortably loop it around my neck three times. I tied the tails of the ends together, and trimmed them so they wouldn't show to make one big loop. You can cut the tails to 1/4" to 1/2" if you like and weave them in with the crochet hook to hide them.


You can also knit three shorter tubes of the same length, and then braid them together to make a bracelet. Here, I mixed two silver tubes with one gold one. I think metallic accessories are perfect for the holidays - they go perfectly with red and green, and gleam against the soft whites of freshly-fallen snow and candlelight!

To create the flapper-style necklace shown in the first photo with your tube, loop the tube around your neck twice. Pull on the bottom loop so that the top loop is close to your neck (as you can see in the photo) and the bottom loop hangs very low over your stomach. Take the bottom loop, and treating it like one big piece of string, tie it into a knot. Gently adjust so that the knot is where you want it to be along the tube, and then tighten the knot.

You can vary this project in lots of different ways, however - larger spools, smaller ones, yarn instead of silver thread, and colored thread instead of silver! You could even spool knit with leather cord instead of string. Use whatever you have, or just whatever you like!

July 21, 2011

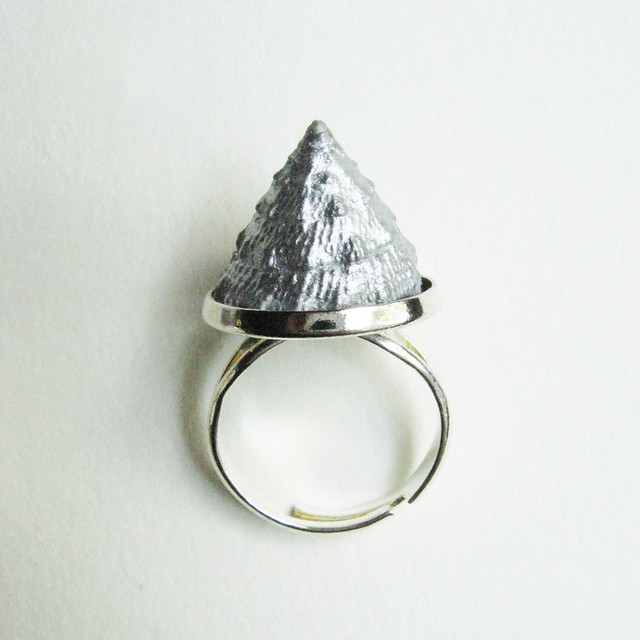
Quick Summer Seashell Ring Tutorial


This silvered shell ring is so easy to diy, you'll be able to whip one up in time for a sunny daytrip or night out whenever you need something new to wear!

You'll need the following (see below for pictures): a ring blank, a seashell of your choice - make sure it's a few millimeters smaller in diameter than your blank, jeweler's glue or epoxy - I use E6000, and Rub 'N Buff in Silver Leaf.


Take your shell, and apply a good amount of glue/epoxy to the bottom. Place it firmly inside your ring blank, and allow it to dry thoroughly (see directions on the tube for approximate times).

Once it's dry, take your Rub 'N Buff and apply liberally using a brush (or your fingers... I tend to use the latter to ensure I get it into every crevice). The Rub 'N Buff shade shown here is liquid silver leaf - so much easier to apply than the extremely fragile leaf sheets! Plus, you don't need a special glue. It will stick to your seashell all on its own. It also comes in a crazy amount of colors - gold leaf in various shades, silvers, pearlescent colors, a vibrant red, and many more.

Allow to dry, then buff off with a rag or paper towel until no more extra silver comes off. That's it! You can wear and enjoy your ring as soon as the silver is dry.

Experiment with different size blanks and shells, or different colors (gold leaf on faux gold, rose gold on silver, pearlescent blue on silver). There are so many different combinations you can play around with to make a ring that's uniquely you.

January 28, 2011

DIY Beaded Applique Headband


Sequined and beaded headbands and fascinators are everywhere these days, but why buy one when you can make your own in just five minutes? Plus, diy-ing it allows you to find the perfect applique for your outfit or evening - no need to merely pick the best of what you see in the store.


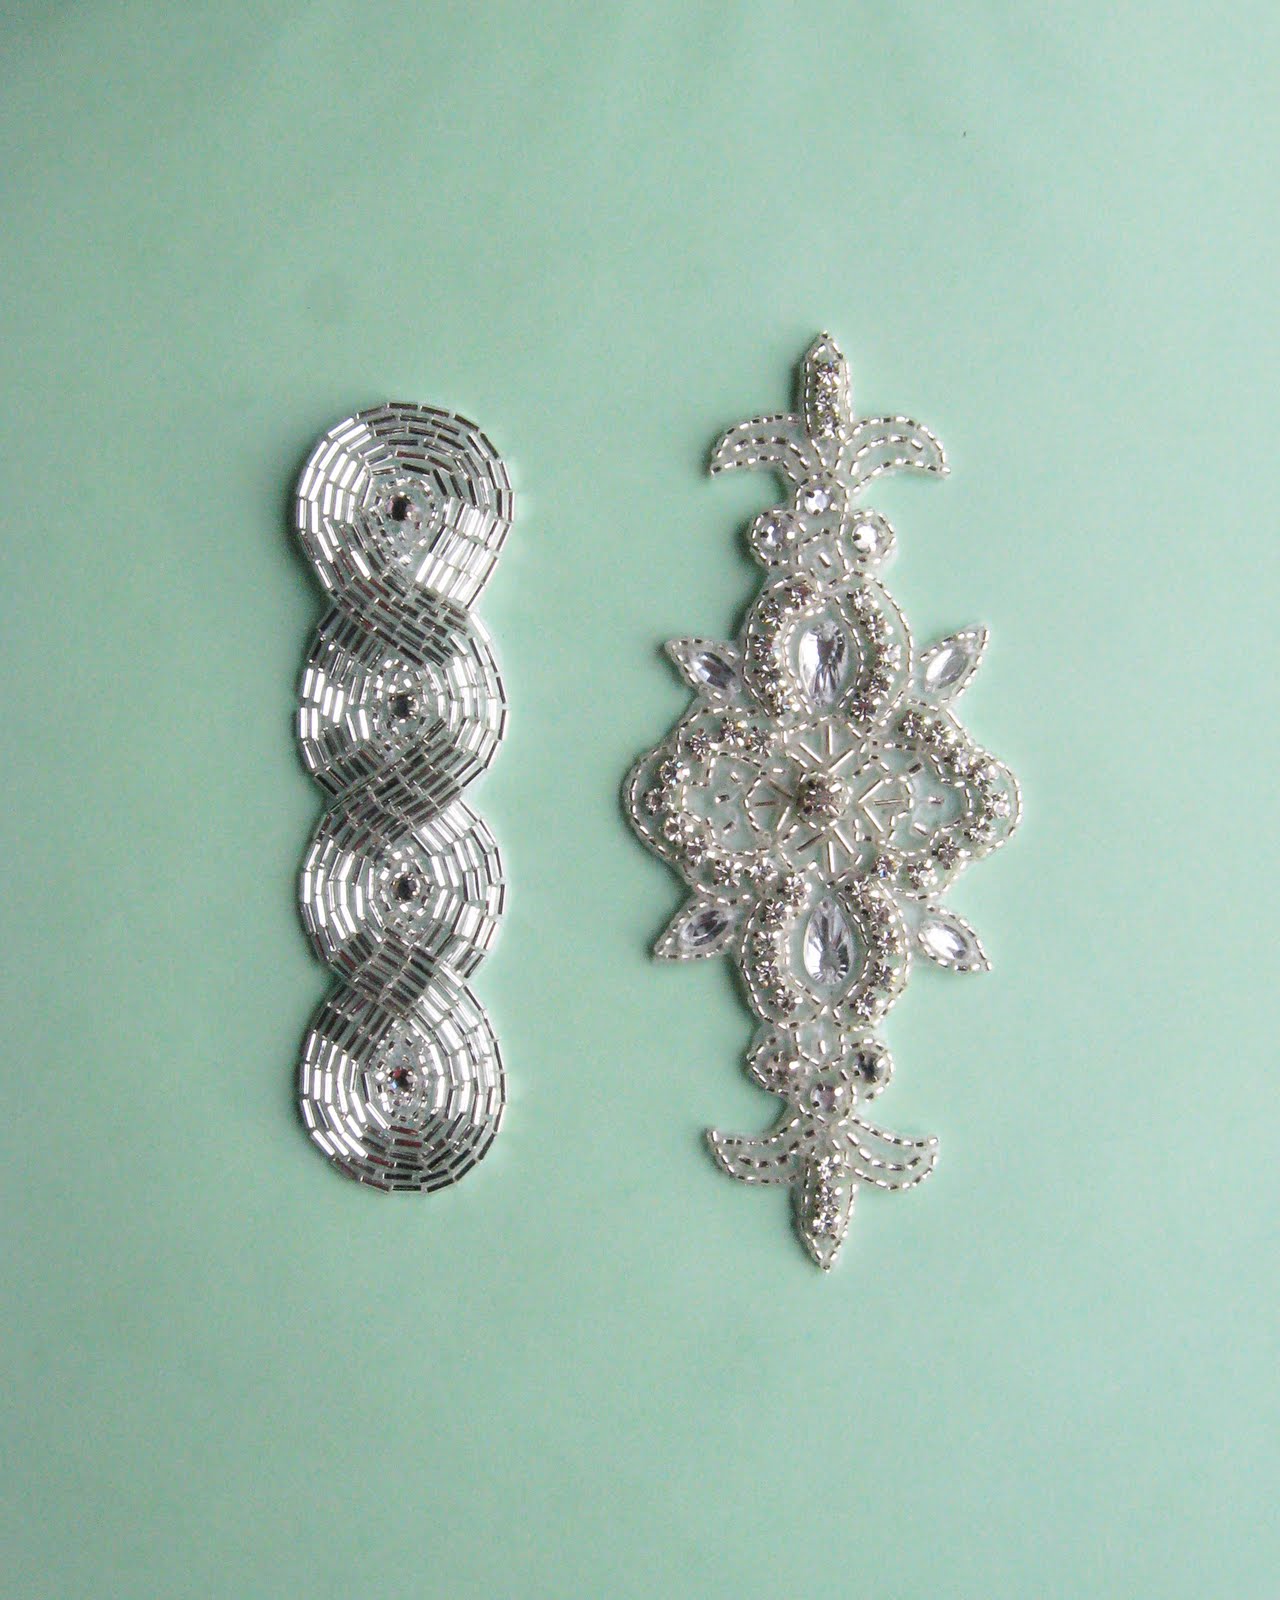
First, you'll need an applique. You could also use a feather pad, but I wanted something glittery and shiny for winter parties. Silver and white just go so well with the snowy surroundings!

I found these lovely silver pieces, along with the white-toned one shown in the first photo, at Sequin Appliques. You can also check local craft and fabric stores, but Sequin has an amazing selection (note: I just like their store, I am not being paid by them in any way, shape, or form!).

You'll also need some ribbon. I found this silver Galena roll at a local store. It's made of metallic material, so it almost feels wired. I thought this would be better for positioning a headband and having it stay in place than a flimsier ribbon. I'd definitely recommend a thin metallic or wired ribbon!

Cut a length the circumference of where you'll wear the headband on your head, plus about 12 inches more (for tying).


Center the ribbon on the applique. You could sew it to the back, but the backing may be quite stiff. I chose to use strong craft glue instead and you could also hot glue it. Just be careful so you don't burn yourself!


Use a good amount of glue so the ribbon is firmly attached.


Make sure you add a bit extra where the applique ends, so the ribbon does not come off. (You want the applique to lay flat on your head, and not stick up at its ends.)


Let the glue dry for several hours, or overnight just to be sure (especially if you live in a humid area).

Though this headband would be great for a party, a sparkly accessory can add interest and 1920's flair to something as simple as a trip to the grocery store!

Fascinators look best worn low on either side of the head, rather than centered, and with the hair pulled back. They match perfectly with a sleek updo, or a low chignon. You could also curl the ends of your hair and style it into a low side ponytail.

If you make this, let me know how you wear it!

June 8, 2010

Initials on a Tree

This stump ring from Digby & Iona would be great for either a guy or a girl, don't you think? It's romantic yet still modern and a bit rugged as the heart is on the side instead of the wood ring top.

It would also make a heartfelt and sweet anniversary present, as you can customize the initials to match you and your sweetie's!

See more from Digby & Iona's current collections here.

March 11, 2010

Thursday Trinkets

"Camera Love Silhouette" by An Original Jewelry. What photographer wouldn't love this?

"Antiqued Finish Rabbit" by Cosmic Firefly. I really like the Art Deco look of this - reminds me of a vintage "Alice in Wonderland" movie.

"I Heart England" by Truche. I'd love to own this - one of my favorite places to visit!

"Circus Trapeze Artist" by MarKhed. This is so clever - she has more circus-themed pieces in her shop!

"Wire Whisk" by Exodesign. Perfect for a baker, or chef!


"Like a Bird Necklace" by Meltemsem. I like how this can be girly or rock star-esque, depending on what you wear with it. It can go either way!

January 30, 2010

Silver "Fabric"


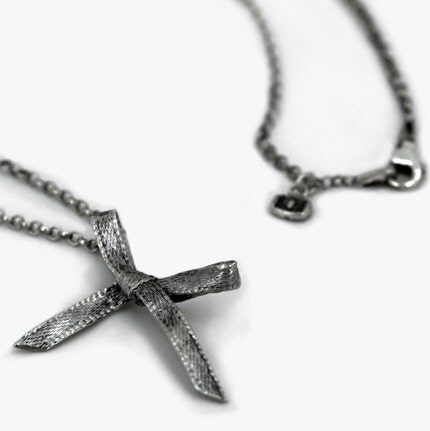
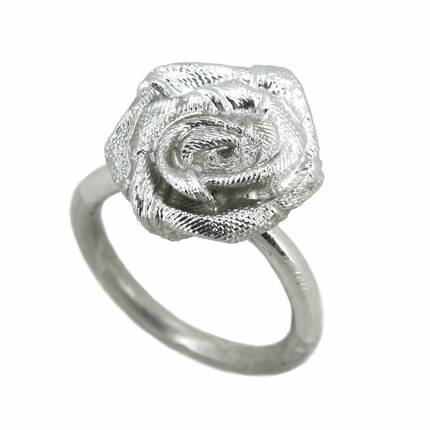
I'd like to introduce you to my new favorite Etsy store, Whitefly. Though these pieces appear to be made of silver-colored fabric, they're actually silver casts of the textiles! The amount of detail is incredible - I still can't believe the lace cuff is all metal.

From top to bottom: "Vintage Delicate Lace Silver Cuff Bracelet", "Forget Me Knot - Satin Ribbon Bow Necklace", and "Petite Satin Ribbon Rose Flower Ring".

August 25, 2009

Etsy Finds: Handmade Necklaces


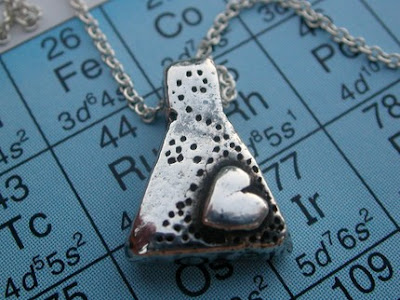
Just thought I'd share my current favorite necklaces from Etsy: Flower Blossom Necklace from Lisa Hopkins, Erlenmeyer Flask Love from NB Designs, and Seaside Collection Necklaces from CourtneyAnne Designs.

Be sure to check out their shops - I'm sure you'll find your own favorites!

April 10, 2009

Etsy Finds

These lovely, handcut sterling silver necklaces are from SkylarkStudio. The stag horns are my favorite, but all their pieces are stylish and beautiful!

You Might Also Like:

Related Posts Plugin for WordPress, Blogger...