Did you guys see Purl Soho's Heirloom Wool Easter eggs pattern? I thought they were nice, but I wanted a thinner version with more colorful flowers. So I decided to wing it and DIY my own.
I started by making a template out of paper. (Save this image, print out at whatever size you like, and use as a template for yours if you like it.)
I then cut twice the number of egg shapes as eggs I wanted to make out of plain white felt. You can use the good wool stuff, but I honestly prefer the polyester - it won't get eaten by moths or carpet beetles over time.
Then cut another template out of paper, but take about 3 - 4 mm off all around. Use this template to cut smaller egg shapes out of thin quilt batting, one per egg.
Then you can either hand-stitch these using blanket stitch, or use a sewing machine to sandwich the batting in between two egg felt shapes and stitch all the way around. If you look closely, I tried out a few different stitches for mine - a small zigzag, a wider zigzag, and some plain stitching. Make sure you catch the back piece of felt as you sew. You can use a walking foot if you have one, but I did these without it - I just went slowly.
Don't worry about it being perfect though! I had some spots where the back piece of felt stuck out from behind the top piece. Instead of redoing it, I either trimmed it with scissors or just put flowers over this spot.
Now for the decorating! I decided to make loops out of thin blue ribbon for hanging. I stitched them on the back side of the egg. (In retrospect, I should've sandwiched them in when I sewed the eggs, but oh well!)
Then I cut petals out of different colors of felt. Many flowers can be broken down into simple shapes. This pansy is just two bigger ovals, two medium ones, and a really big one that's almost pinched into a triangle at the top out of purple felt. Then cut two small ovals and another medium oval out of a contrasting color (here I used yellow). Then layer your petals as shown and stitch on using embroidery thread.
For this one, I drew a five-petaled flower, cut it out, and then turned it over so the pencil lines wouldn't show. If drawing isn't your thing, just do a basic five-pointed star then nip a bit more out of the petals near the center to give them a better shape. I layered a smaller flower over a larger one for the middle bloom. These were stitched on using pale pink embroidery thread and tiny stitches.
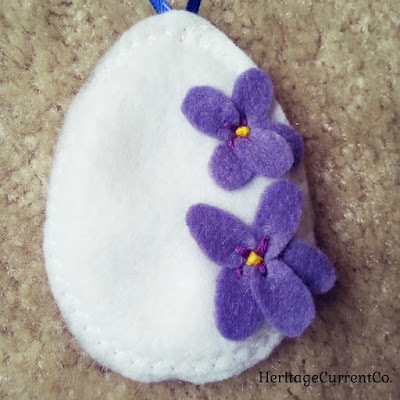
Violets are one of my favorite spring flowers! These are just two smaller ovals on top with three larger ovals on the bottom. I stitched the petals on with purple thread, then added bright yellow centers.
I got a little fancier with this one. It's just two purple cones and a larger pink oval for the pink hyacinth and purple grape hyacinths. I stitched little flower shapes in pink for the middle part, then just did lots of French knots (do a Google image search to find step-by-step tutorials!) for the side flowers.
Here you can see the other bluebells, abstract round flowers, and orange-centered daffodils one I made. Just play around with colors and your favorite blooms to customize these!


No comments:
Post a Comment